Creating a Static Site Hugo Blog

Last Updated: 2023-08-19
I chose hugo since I heard it was great for static site building and I heard about it again on the Talk Python To Me podcast.
I had never used Go before either, so it was nice to see a new technology. I’m hosting it on the github page for my account. Here is the guide for github pages.
Hugo made it very easy to deploy the site via github actions. My hugo.yaml workflow is copied directly from the official hugo example. The template language reminds me a lot of django, so making some html optional was straightforward.
I tried a few different themes but finally settled on Blonde because of its ease of use to set up and the fact that thumbnails would show up on blog posts. Blog posts should catch people’s eyes the moment they see them and it seems more difficult on a home page of all text.
Technologies Used
- Github for hosting
- Github Actions for site deploying
- Hugo (and Go) for static site creation
- Blonde Hugo Theme
- npm as a dependency to the theme
- tailwind as a dependency to the theme
Setting up my local environment
I started this project on a new windows machine. These are the tools and dependencies used.
Tools:
Dependencies:
- Git (installed by cmder)
- Node
- Go Programming Language
- Hugo
Creating my Repo
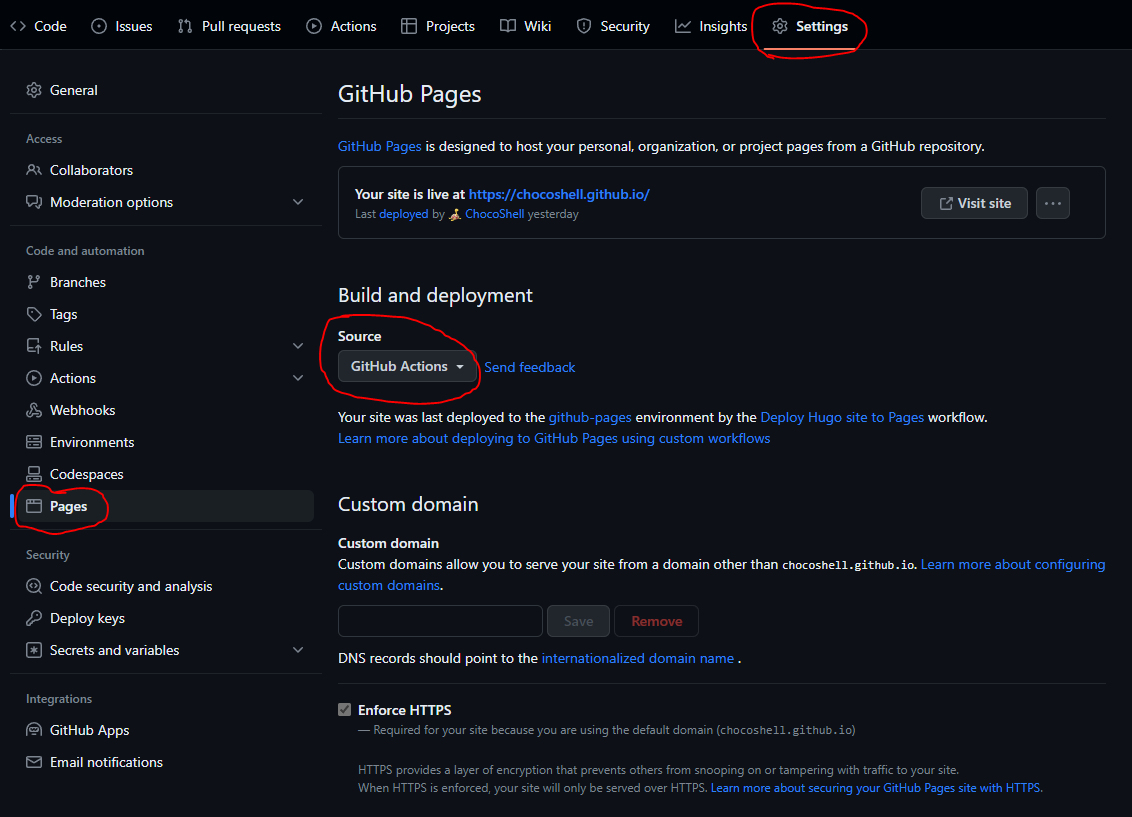
I started by creating a new repo for the blog. The github pages guide recommends using this convention <username>.github.io for the repo name with <username> being your username without the angled brackets. Once created, we can initialize it with an empty README.md file so that we can change the repo settings to prepare it for the github pages deploy. We can now go to our repo and click the Settings tab at the top, followed by the Pages tab under the Code and Automation section and finally, changing the Source from Deploy from as branch to Github Actions. Now, github will read from our .github/workflows/ folder to see how it should deploy the site.
Creating the Blog
Followed this guide for this part: https://medium.com/@magstherdev/hugo-in-10-minutes-2dc4ac70ee11
Git clone your new repo locally.
git clone <username>.github.io
cd <username>.github.io
In your new repo’s directory, create the hugo site.
hugo new site . --force
and install a theme. Each theme will have instructions, but I like how paperesque installed their theme which I will use to install the theme I used, Blonde.
git subtree add --prefix themes/Blonde https://github.com/opera7133/Blonde master --squash
Note: if you want to install other themes, you will need to change themes/Blonde to the theme you’re downloading, update the github url, and update the main branch name (for Blonde it was master, for paperesque it was mainline, etc).
Copy the necessary files from the Blonde/exampleSite folder. These are package.json, postcss.config.js, config.toml (rename this hugo.toml), and tailwind.config.js.
Now, following the instructions on Blonde, we can install our npm dependencies.
npm install
Let’s run the site!
npm run start
It should be running on localhost:1313
The homepage should work but the about page and contact page will probably lead you to 404 pages.
We can fix that by creating (or copying from the example site, to start with) an about.md file into content/about.md and for contact we can do the same or remove Contact from our hugo.toml file.
[[menu.main]]
  identifier = "contact"
  name = "Contact"
  url = "/contact/"
  weight = 3
We can also add sections in the same way.
We can create posts on this blog by making new markdown files under content/post/some-post-name.md
Deploying the Blog
Now that we created the blog and added a post. We need to tell github how to deploy our blog.
Hugo has a good guide on this here: https://gohugo.io/hosting-and-deployment/hosting-on-github/
The gist of it is:
- create a folder called
.github/in the root of your repo - create a folder inside the above folder called
workflows/ - create a
hugo.yamlfile in the new folder above. - Copy the github actions code into the
hugo.yamlfile
Commit these changes and push it to your repo.
git commit -am "Creating Blog"
git push
Github should pick up on the actions in your .github/workflows and deploy the project in a couple of minutes. You should then be able to go to <username>.github.io and see it deployed.
Observations
- config.toml and hugo.toml are the same thing. hugo.toml is newer
- Hugo templating is similar to django. Easy for me to make changes
Changes made to Blonde theme locally
- Made the Disqus area under every post optional by checking if the
disqusShortname(unique identifier for each site) was present or not. - Added a caption under the blog post image so I can add attributions.
Things I would Revisit
- Spent a lot of time trying to get
nodistto work on windows but couldn’t. It is a node version manager. It kept giving me the latest node version but would never update its version of npm. Might revisit on my next node project.
Future Work
- 🔳 Create a Real Name for the Blog
- 🔳 Update About Page
- 🔳 Update Contact Page
- 🔳 Add copy code block button
Closing Thoughts
This blog is supposed to be for my general projects. I mostly do python with a focus on automation. My last project was automating a card game mode. I plan to upload ML/AI focused projects soon, dabbling into NLP and general MLOps.